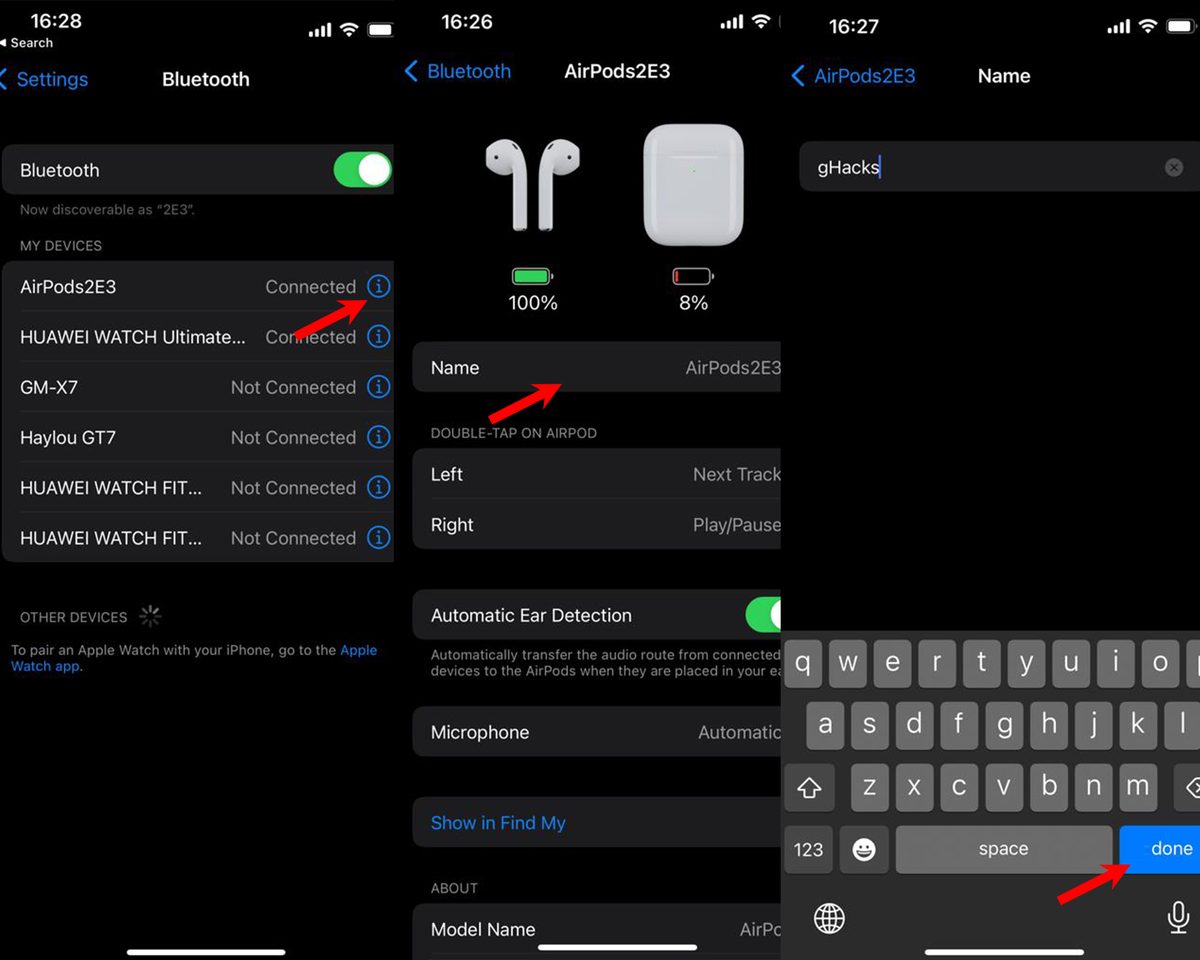
With this article, you can learn how to change AirPods name.
If you own a pair of AirPods, you might want to customize their name to make them more personal or easier to identify. For example, you can change the name to something like "Eray's AirPods" or "Workout Earbuds."
How to change AirPods name: A step-by-step guide
Changing the name of your AirPods is a simple process that only takes a few minutes. Here's how to do it.
- Step 1: Connect your AirPods to your iPhone or iPad via Bluetooth. Make sure your device is running iOS 14 or later. You can check your software version by going to Settings > General > Software Update.
- Step 2: Open the Settings app on your iPhone or iPad and tap on Bluetooth. You should see a list of devices that are paired with your device. Find your AirPods and tap on the "i" icon next to their name.
- Step 3: Tap on Name and enter the new name you want for your AirPods. You can use any characters you like, but keep in mind that some symbols or emojis might not display properly on other devices. Tap on Done when you are finished.

That's it! You have successfully changed the name of your AirPods. The new name will appear on your device and any other devices that are connected to your AirPods. You can also change the name of your AirPods from your Mac or Apple Watch by following similar steps.
The same procedures apply to renaming any of your other Bluetooth gadgets.
Why change your AirPods name?
There are several reasons why you might want to change the name of your AirPods. Here are some of them:
- To make them more personal and unique. You can use your name, nickname, initials, or anything else that reflects your personality or style.
- To avoid confusion with other AirPods users. If you have multiple pairs of AirPods in your household or workplace, changing the name can help you distinguish them from each other and avoid mixing them up.
- To protect your privacy and security. If you lose your AirPods or leave them somewhere, changing the name can make it harder for strangers to access them or identify you as the owner.

Tips and tricks for using AirPods
Now that you know how to change the name of your AirPods, here are some other tips and tricks that can help you get the most out of them:
- To check the battery level of your AirPods, open the case near your iPhone or iPad and wait for a pop-up window to appear. You can also swipe down from the top right corner of your screen and tap on the battery widget.
- To customize the settings and features of your AirPods, go to Settings > Bluetooth > Your AirPods > i icon. You can change things like automatic ear detection, noise cancellation, spatial audio, microphone mode, and more.
- To switch between devices that are connected to your AirPods, go to Control Center on your iPhone or iPad and tap on the AirPlay icon. You can also use Siri to switch devices by saying something like "Hey Siri, switch to my Mac".
- To share audio with another person who has AirPods or compatible headphones, go to Control Center on your iPhone or iPad and tap on the AirPlay icon. Then tap on Share Audio and follow the instructions on the screen.
- To clean your AirPods, use a soft, dry cloth to wipe them gently. Do not use any liquids, solvents, or abrasive materials. If there is any debris in the speaker grills or microphones, use a soft-bristled brush to remove it gently.
Changing the name of your AirPods is a quick and easy way to personalize them and make them stand out from the crowd. You can also customize other settings and features of your AirPods to suit your preferences and needs.
Thank you for being a Ghacks reader. The post How to change AirPods name? appeared first on gHacks Technology News.
0 Commentaires