The Local Security Authority is a crucial component of the Windows security system, responsible for verifying a user's identity during the sign-in process on a local computer. It checks password changes and login attempts, generates access tokens for single sign-in sessions, and carries out other authentication and authorization tasks in Windows.

Securing the Local Security Authority subsystem is one of the most important steps you can take to safeguard your system and accounts against cyber threats. By enabling Local Security Authority protection, you will have increased control over potential cleartext password vulnerabilities and password dumping attacks, providing an extra layer of security for your system.This guide will show you how to turn on Local Security Authority (LSA) Protection in Windows 11.
How to enable LSA protection on Windows 11
Windows 11 provides support for Local Security Authority protection to help prevent unauthorized access to your system by attackers. In this post, we'll cover three methods for enabling LSA Protection in Windows 11:
- Using the Windows Security app.
- Using the Windows Registry Editor.
- Using the Local Group Policy Editor.
It's important to note that you need to have administrator privileges to enable the extra protection for Local Security Authority in Windows 11.
How to enable LSA using the Windows Security app
To enable the Local Security Authority protection in Windows 11 using the Windows Security app, follow these steps:
- Go to the Windows search bar and type 'windows security'.
- Select the 'Windows Security' option from the search results.
- Expand the left menu in the Windows Security app by clicking on the menu icon.
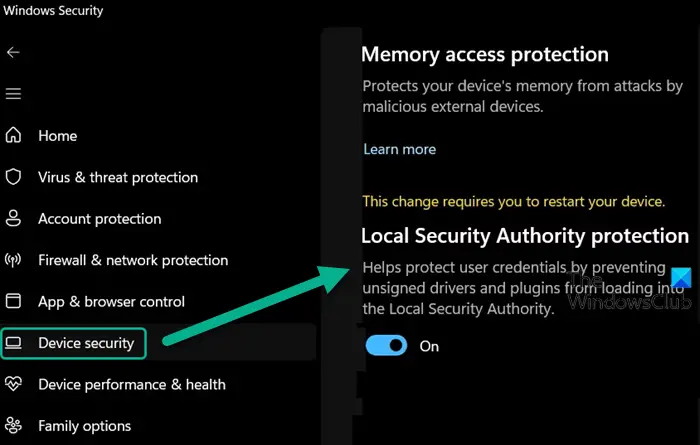
- Click on the 'Device Security' option.
- Under the 'Core isolation' section, click on the 'Core isolation details' link.
- Turn on the toggle button for the 'Local Security Authority protection' option.
- Confirm the change by clicking 'Yes' in the User Account Control prompt that appears.
- Finally, restart your PC to apply the changes.
By enabling the Local Security Authority protection, you can protect your device and system resources from attackers who might try to gain unauthorized access to your system by stealing your credentials. The ‘Local Security Authority protection is off, Your device may be vulnerable’ alert in Windows Security is a warning message that your device is at risk, so it's important to fix it by enabling the feature.
How to enable LSA using the Registry Editor
You can also enable the Local Security Authority protection through Windows Registry. However, before you make any changes, it's important to back up your registry or create a system restore point to keep your system secure.
Here's how you can do it:
- Press the Win + R key combination and type 'regedit' in the Run dialogue box.
- Hit the Enter key.
- Say yes to the User Account Control prompt.
- In the Registry Editor, navigate to this path: Computer\HKEY_LOCAL_MACHINE\SYSTEM\CurrentControlSet\Control\Lsa
- On the right panel, double-click on RunAsPPL.
- Change the value data to 1 and hit OK.
- Finally, restart your PC to apply the changes.

How to enable LSA using the Group Policy Editor
If you have a Windows Pro or Enterprise edition, you can use the bundled Local Group Policy Editor to enable the Local Security Authority protection. If you have the Home edition, don't worry, you can still access this tool using Policy Plus freeware. Just make sure to create a system restore point before making any changes to your Windows Policy.
Here's how you can enable the Local Security Authority protection with the Local Group Policy Editor:
- Open the Run dialog box by pressing Win+R and type 'gpedit.msc.'
- Press Enter and navigate to Computer Configuration\Administrative Templates\System\Local Security Authority in the Local Group Policy Editor window.
- In the right panel, double-click on 'Configure LSASS to run as a protected process' policy.
In the policy settings window, select 'Enabled' and choose either 'Enabled with UEFI Lock' or 'Enabled without UEFI Lock' in the dropdown menu.
- If you choose 'Enabled with UEFI Lock,' LSA will run as a protected process and the configuration can't be disabled remotely.
- Click OK, then Apply.
Thank you for being a Ghacks reader. The post How to enable LSA protection on Windows 11 appeared first on gHacks Technology News.


0 Commentaires